
Me and My Shadow
- Jim Ratti
- Mar 5, 2021
- 8 min read
In January 2021 a customer contacted me to ask if I could get his 1988 Honda VT1100C Shadow running again. It had been stored in his garage (with the fuel turned on) for about eight years and "ran when parked." I enjoy challenges like this so I went to see and pick up the bike.
The bike was in pretty good shape overall, if a bit dusty and dirty. The tires (new when parked) showed no signs of cracking, thanks to indoor storage. The battery was dead so I couldn't tell if the engine would turn freely or not. But soon discovered that the front brake was all but locked up, probably because the pistons were stuck in the cylinders.
The gas tank still had fuel in it, and it looked (and smelled) BAD. Lots of rust and gunk. I knew then that we'd be in for a thorough fuel system cleanout and that I would almost certainly need to remove, clean and rebuild the carburetors.
I pulled the attachment bolts holding the brake caliper to the fork so that I could remove the caliper and roll the bike to my trailer. I soon had it back at the shop where I could get it on the lift and do a thorough assessment.
Here are a couple of pictures of the partially disassembled Shadow on my lift, as I looked it over:


I didn't have the correct battery, but I used one of my other ones to energize the electrics and verify that everything worked. I was able to turn the engine over with the starter just fine, and was happy to find it had both good compression and a strong spark. All four spark plugs were a bit sooty, but otherwise in good shape. I cleaned, gapped and reinstalled them. This bike has an electronic ignition system that requires no adjustments. So I knew if I could get the fuel system sorted it'd almost certainly run okay.
After thoroughly looking everything over, I came up with the following items to address:
Fuel tank & petcock cleaning (and perhaps a petcock replacement)
Fuel filter replacement
Fuel pump cleanout and operational check
Carburetor removal, disassembly, ultrasonic cleaning, rebuild, reinstallation and synchronization/adjustment
Battery replacement
Front brake caliper rebuild & system bleed
Clutch master cylinder rebuild & system bleed
Engine oil/filter change
Final drive oil change
Coolant system flush and refill/purge
And of course, a test ride!
I started out with something easy - the fuel cap. This was a quick kill, requiring just 10 or 15 minutes in my ultrasonic cleaner to get looking like new. Click the arrow on the right of the picture below to see what it looked like afterward.


This motorcycle has an electric fuel pump and it's in an almost inaccessible location behind and below the engine. Besides that, it's an expensive part so I was really hoping I didn't have to replace it. I connected an external fuel tank with fresh gas to the input line and put a catch container under the pump's outlet tube. There's a way to hotwire the pump so that it runs continuously, so I did that. When I turned on the power I heard the pump start right up - good news! After several seconds some really ugly, stinky old gas sputtered out of the outlet, followed by progressively cleaner and cleaner fuel. After a fair bit of flushing, it ran clear and strong. I replaced the fuel filter, then measured the volume of the pump's output over time and found that it exceeded the Honda minimum spec. So, that was one less worry.
I drained the engine oil and removed the filter, discovering that the oil was significantly contaminated with gas. This is common in bikes that sit for long periods with the fuel left turned on. Often one or more of the carburetor float valves stick open and gas drains from the tank, through an open intake valve, past the pistons/rings and into the crankcase. No biggie - just requires an oil change.
I cut the oil filter open and found only old oil - no sign of visible metal filings that might indicate excessive wear/damage inside the engine or transmission. More good news! I spun on a new filter and refilled the crankcase, then turned the engine over with the starter until the oil pressure light went out. So, I knew the oil pump worked.
Although I knew it was a fool's errand, I connected up my external gas tank and tried to start the bike, just on the off chance that the carbs survived eight years of ethanol fuel-soaked slumber. No dice - I got it to run (very poorly) on one cylinder, and only under full choke. Oh well. On to the carbs...
The carbs on this bike are comparatively complex, and they're deeply buried on the top of the engine:
Left Side view - the carbs aren't even visible:

Right side view - carbs circled in blue:

I took a bunch of pictures of everything as I disassembled all the plumbing and hardware. Although I had the service manual, the exploded views often leave much to the imagination about how everything actually fits when installed. Having pictures during reassembly really helps!
Here's what it looked like just before I pulled the carbs out:

After a bit of wriggling and twisting, I solved the spatial relationship puzzle and had the carbs on my bench for examination:


Not too bad. From the outside...
Internally things weren't as good. Although I've seen worse, there was a lot of varnished fuel and nearly every jet and passageway was clogged. Here are several photos. Click on any to enlarge:


I carefully disassembled both of them, and apart from needing a thorough cleaning, found the parts to be in good shape. Even the diaphragms were intact and flexible. I wouldn't need any parts except for the bowl gaskets. I placed an order for those while I had the rest of the parts in the ultrasonic cleaner.
Here's everything after ultrasonic cleaning, ready to reassemble:

Once the new bowl gaskets arrived, "all" I had to do was put everything back together and reinstall the carbs. It was a bit fiddly getting the carbs back in the bike, but it all went back together nicely. After connecting my external fuel tank and verifying I had fuel flowing to both carbs, I fired it up. It ran! The carbs were a bit out of sync and needed some tweaks, but I got that sorted out in short order and had the engine running sweetly. Now on to the rest of the to-do list...
The new battery arrived, so I serviced it with fresh electrolyte and put it on the charger overnight. It was full-up the next day, so I installed it.
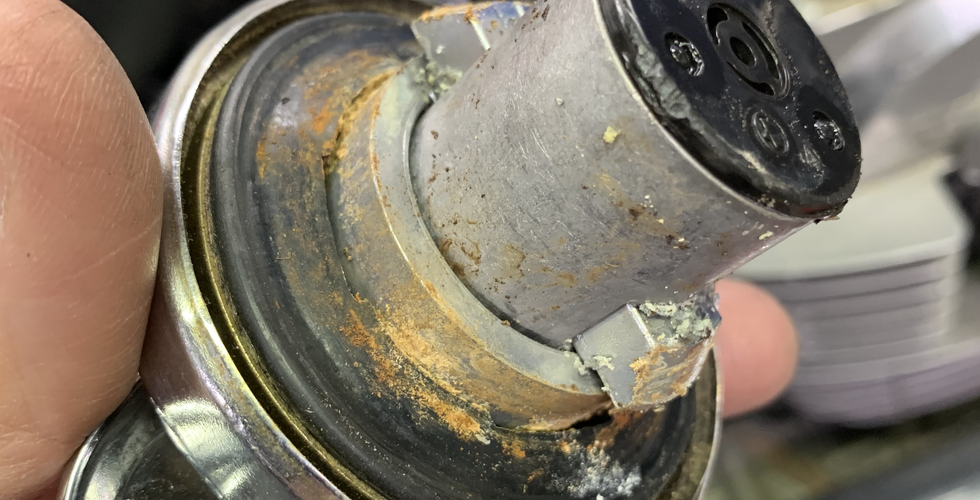
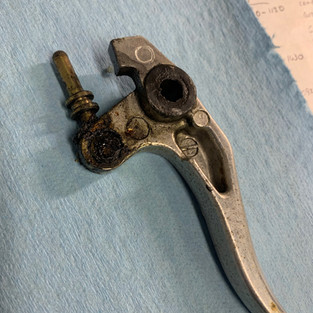
This bike has a hydraulically-operated clutch. During my initial exam I found that the clutch master cylinder on the handlebar showed evidence of leaking. I removed the clutch lever and found that the rubber boot on the piston was torn. Also, the fluid reservoir was full of rusty-looking hydraulic fluid. See below:


When I removed the piston from the master cylinder, it looked like this:

Eew...
After a bit of cleaning and vapor honing (and a rebuild kit that included a new piston), it was ready to reassemble, install and bleed.


In removed and inspected the slave cylinder down on the engine and found it to be in good shape. So, I added clean DOT 4 brake fluid, flushed the old fluid from the line and bled the system. I soon had a smooth-working clutch. On to the front brake caliper!
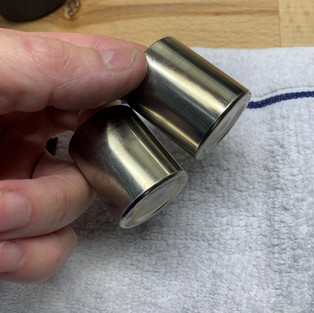
The caliper itself was in pretty nice shape externally. The pads showed little wear and weren't contaminated, so I could reuse those. I added fresh brake fluid to the master cylinder (it was nice and clean internally) and cycled the brake lever to push the pistons out of the cylinders. As I suspected, the pistons and cylinders showed a fair bit of corrosion. Nothing that would require anything more than cleaning though. Here's what it looked like:


I sourced new seals for the cylinders, and after some vapor honing and cleanup, I had everything ready to put back together:


Reassembly, reinstallation, flushing and bleeding were straightforward and I was rewarded with a nice, firm brake handle and no leaks. Score!
Next, I flushed the cooling system. The hardest part of this was accessing the filler necks for the top of the radiator (under a shroud by the steering stem) and the coolant reservoir (low on the back side of the engine). The process is simple - run the engine and warm the bike, drain the existing coolant, flush with clear water, then add flushing solution and let the bike run for about 30 minutes to circulate the flushing solution and loosen the gunk. Flush and drain again, then fill with fresh 50/50 coolant and run the engine to purge all the air. Top off, check for leaks, and you're good to go. All that went smoothly, and I was pleased to see minimal corrosion and crud in the old coolant. The fan cycled on and off regularly as the engine ran, with no signs of overheating.
Draining and refilling the final drive with fresh hypoid gear oil was not difficult. I let it drain while I was working on other parts of the bike, then refilled with new oil.
I'd saved (or put off) the "best" until last - the fuel tank. This, literally, was a mess. Here's what it looked like through the filler neck:

I removed the petcock and drained the old gas out. Here's what that looked like:

Yeah, not what you want to see...
I thought I might be able to clean the old petcock in my ultrasonic cleaner and reuse it, but even three fifteen-minute cycles wouldn't get it flowing again. The petcock is riveted together and not made to be taken apart, so I couldn't get inside to clear everything. Even if I could have drilled out the rivets, the internal rubber parts aren't available. So, I caved and bought a new OEM replacement. Here's what the old one looked like:

Conventional wisdom is to throw a handful of small nuts, bolts and washers into the tank along with solvent or some other cleaning solution, then shake 'til your arms fall off. The hardware will work all the scale and varnish loose. However, this tank has a splash guard around the filler neck that protrudes down into the tank about an inch or so. This would make it impossible to shake all the hardware out of the tank afterwards. Further, I couldn't use a magnet to fish the bits out because of the way the center hump on the inside of the tank blocked access to the bottom.
So, I capped off the petcock mounting hole and put about a quart of acetone in the tank. I put the cap back on and turned and shook the tank repeatedly throughout the day. I let it sit overnight, then shook and drained it the next day. After draining it out and flushing the tank with water, I got a lot of the varnished gunk out of the tank. But a lot of rust remained.
Next, I filled the tank to the brim with hot (about 170°) distilled vinegar and let it soak overnight. The next day I was pleased to see rust flakes floating inside the tank. When I drained it out, I got LOADS of rusty gunk, like this:

Then I flushed, and flushed, and flushed some more with hot water until everything ran clear. I dried the tank out with compressed air and let it sit overnight again. Then I added a bit of fresh gas (again with the petcock hole capped off) and shook the tank some more. It took about three cycles of this to get the last of the rusty stuff out. Here's what it looked like after all that:

Nice.
I installed the new petcock and put the tank back on the bike. I added some fresh gas, hotwired the fuel pump to purge all the fuel lines, and then started the bike. All went well.
I put all the ancillary bits (seat, side covers, bags, etc.) back on the bike and was just about ready for a ride. But first I did one last check to make sure everything was tight, adjusted and correctly assembled. Then I suited up (it was about 25° out!) and took a few laps around the building. The engine was running fine and the brakes & clutch worked very well, so I hit the road. Everything worked GREAT. The engine pulled nice and strong and made torque like the proverbial tractor. I thoroughly enjoyed the ride despite the cold. The next day, I delivered the Shadow to a very happy customer. I left the detailing to him!
It was really gratifying to get this wonderful 33-year old cruiser back on the road. What can I resurrect for you?